You are viewing an unreleased or outdated version of the documentation
Using Branch Deployments (CI) with GitHub Actions#
In this guide, we'll walk you through setting up Continuous Integration (CI) using Branch Deployments with GitHub Actions.
Using this approach to branch deployments may be a good fit if:
- You use GitHub for version control
- You want Dagster to fully automate Branch Deployments
If you don't use GitHub for version control or want full control over your setup, check out the Branch deployments with the dagster-cloud CLI guide.
Prerequisites#
To complete the steps in this guide, you'll need:
- Organization Admin permissions in Dagster+
- The ability to run a new agent in your infrastructure. This isn't required if you're using Serverless deployment.
- The ability to configure GitHub Actions for your repository. This isn't required if you used the Dagster+ GitHub app to connect your repository as a code location.
Step 1: Generate a Dagster+ agent token#
In this step, you'll generate a token for the Dagster+ agent. The Dagster+ agent will use this to authenticate to the agent API.
- Sign in to your Dagster+ instance.
- Click the user menu (your icon) > Organization Settings.
- In the Organization Settings page, click the Tokens tab.
- Click the + Create agent token button.
- After the token has been created, click Reveal token.
Keep the token somewhere handy - you'll need it to complete the setup.
Step 2: Create and configure an agent#
While you can use your existing production agent, we recommend creating a dedicated branch deployment agent. This ensures that your production instance isn't negatively impacted by the workload associated with branch deployments.
Using the tabs, select your agent type to view instructions.


Step 3: Add GitHub workflow files to your repository#
In this step, you'll add the required GitHub workflow files to your GitHub repository. The files can be found in our Hybrid quickstart repository or Serverless quickstart repository, depending on the agent you are using.
Copy the following files to your repository (the linked files are shown in the Hybrid repo, there are equivalents in the Serverless repo).
In the next step, you'll modify these files to work with your Dagster+ setup.
Step 4: Configure the GitHub repository#
In this section, you'll:
- Add the agent registry to
dagster_cloud.yaml - Configure GitHub Action secrets
- Update GitHub Workflow files
- Verify Action runs
Step 4.1: Add the agent registry to dagster_cloud.yaml#
In the dagster_cloud.yaml file, replace build.registry with the registry used by the agent you created in Step 2.
For example:
# dagster_cloud.yaml

locations:
  - location_name: example_location
    code_source:
      python_file: repo.py
    build:
      directory: ./example_location
      registry: 764506304434.dkr.ecr.us-east-1.amazonaws.com/branch-deployment-agent
Step 4.2: Configure GitHub Action secrets#
Want to use secrets in your Dagster code? Check out the Dagster+ environment variables and secrets guide for more info.
- In the repository, click the Settings tab.
- In the Security section of the sidebar, click Secrets > Actions.
- Click New repository secret.
- In the Name field, enter the name of the secret. For example,
API_TOKEN - In the Value field, paste the value of the secret.
- Click Add secret.
For Hybrid deployments, repeat steps 3-6 for each of the secrets required for your registry type:


Step 4.3: Update GitHub Workflow files#
In this step, you'll update the GitHub Workflow files in the repository to set up Docker registry access.
In the .github/workflows/dagster-cloud-deploy.yml file, uncomment the step associated with your registry. For example, for an Amazon ECR registry, you'd uncomment the following portion of the workflow file:
jobs:
  dagster-cloud-deploy:
    steps:
      - name: Configure AWS credentials
        uses: aws-actions/configure-aws-credentials@v1
        with:
          aws-access-key-id: ${{ secrets.AWS_ACCESS_KEY_ID }}
          aws-secret-access-key: ${{ secrets.AWS_SECRET_ACCESS_KEY }}
          aws-region: ${{ secrets.AWS_REGION }}
Save and commit the file to the repository.
Step 4.4: Verify Action runs#
The last step is to verify that the Action runs successfully.
In the repository, click the Actions tab.
In the list of workflows, locate the latest branch deployment run. For example:

If the run finished successfully, that's it!
Step 5: Access the branch deployment#
Now that Branch Deployments are configured, you can check out the preview in Dagster+. There are two ways to do this:
From a pull request#
Every pull request in the repository contains a View in Cloud link:
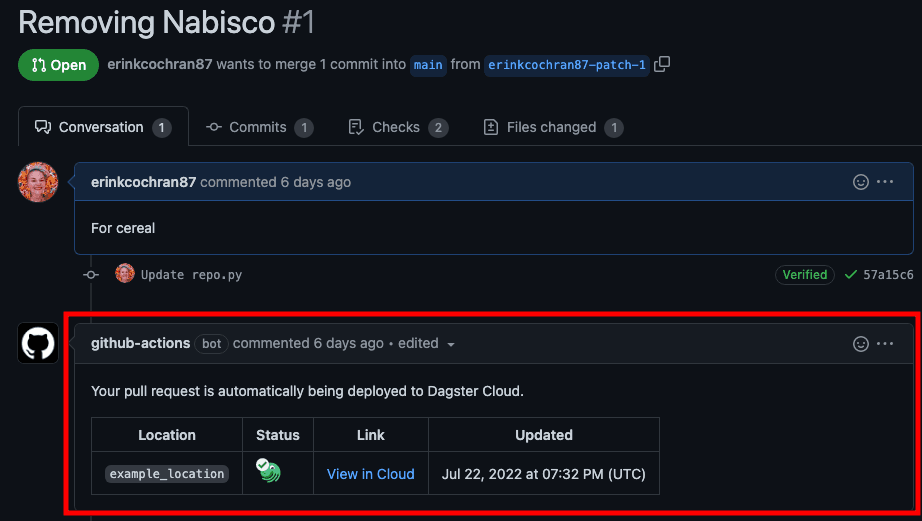
Clicking the link will open a branch deployment - or a preview of the changes - in Dagster+.
Directly in Dagster+#
You can also access branch deployments directly in Dagster+ from the deployment switcher:
